
A. Introduction
Find here various aspects of entering (participating) a video conference:
a. getting the link (section 1)
b. pre-meeting screen in general (section 2)
c. config of microphone (see section 3)
d. config of video camera (see section 4)
e. settings on pre-meeting screen (section 5)
f. starting the video conference with the microphone on or off (section 6)
g. starting the video conference with the video camera on or off (section 7)
h. muting / unmuting microphone inside the video conference and video camera as well (section 8)
i. if the microphone or camera is not working as expected (section 9)
h. different options to participate in a video conference (section 10)
We hope you find this information useful. If you believe something is missing, please contact support@immail.ca.
1. The Link
To enter a video conference session you must have a link. It’s a URL.
Usually, the link has the format:
https://web.immail.ca/meet/<codeId>
On an on-premises installation it will look like:
https://immail.<on-premises domain>/meet/<codeId>
If someone received the link (we will see the various alternatives to generate it following this) s/he can share this link with you.
You may generate the link from the following:
a. inside the video conference by itself (section 1.1)
b. on your chat screen (section 1.2)
c. on the video conference tab – desktop (section 1.3)
d. on a mobile – you must install the imMail Meet app (section 1.4)
With the link, you may share it with someone else (there is an option to do that inside the video conference, or you may share it through social networks, email, etc).
1.1 Video Conference Invitation Using imMail Desktop or Browser
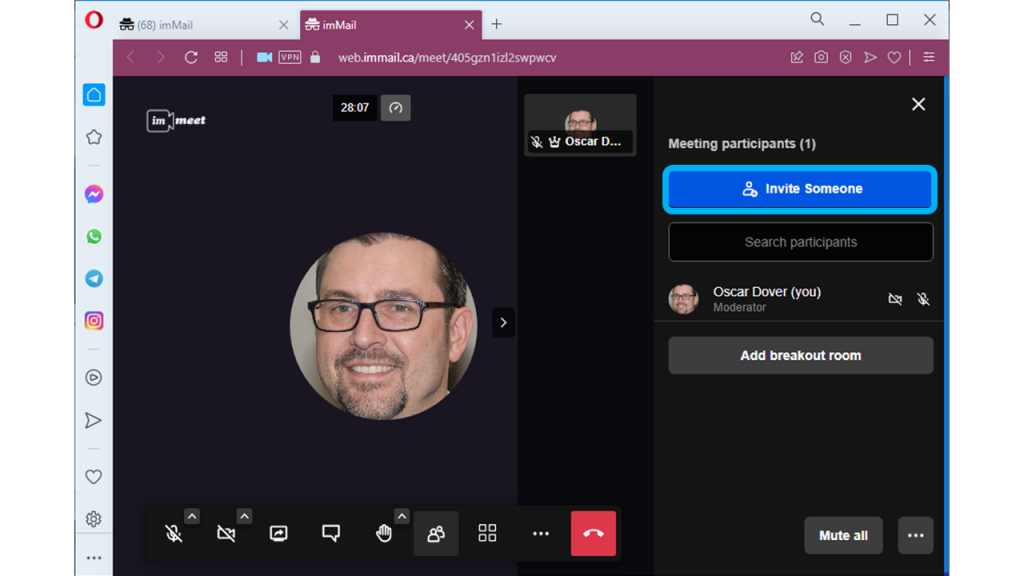
Click on the participant’s icon
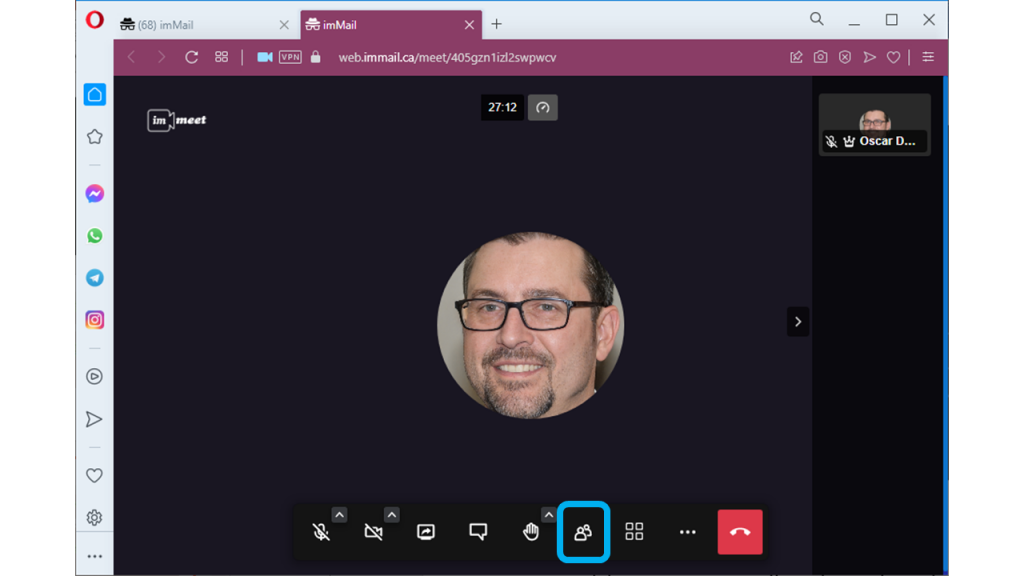
Click on Invite Someone
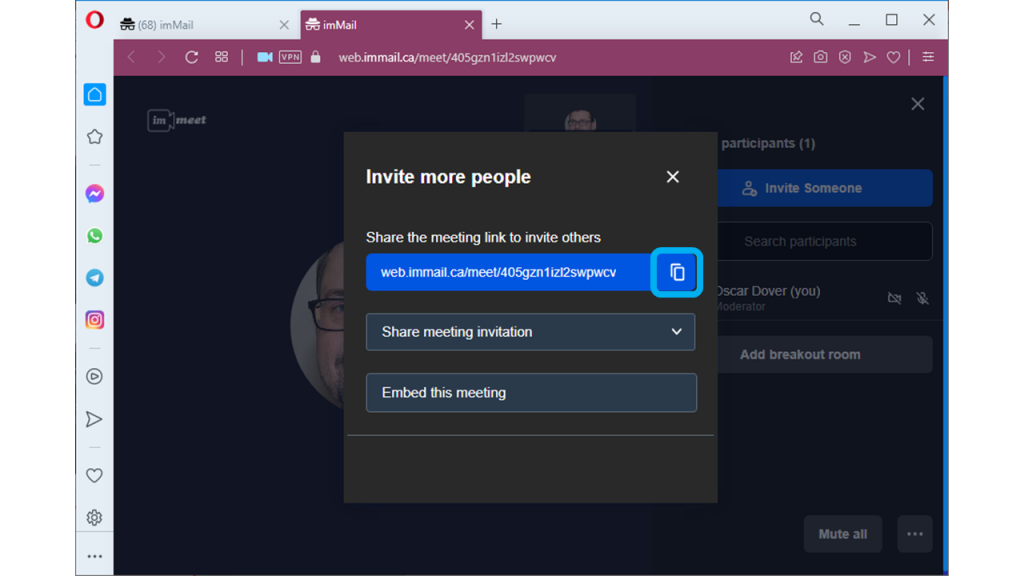
Click on the Blue button with the link. At your transfer area, you’ll have a copy of the link.
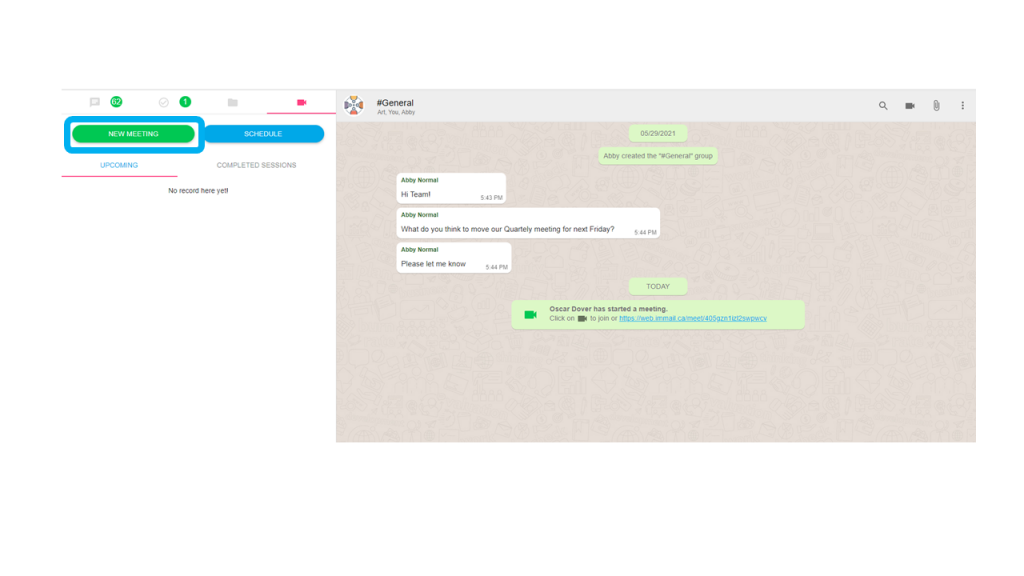
1.2 Video Conference Invitation Using imMail Desktop or Browser – Private or Group Chat
1.3 Video Conference Invitation Using imMail Desktop or Browser – Video Conference Tab (Web)
1.4 Mobile Link Tips
1.4.1 – Installing imMail Meet App
Before talking about links, it’s important to note that you must download imMail Meet app for your mobile. There is an app for both iPhones and Androids.
If you have not installed imMail Meet, you will be asked to download and install the app when clicking a link on your mobile.
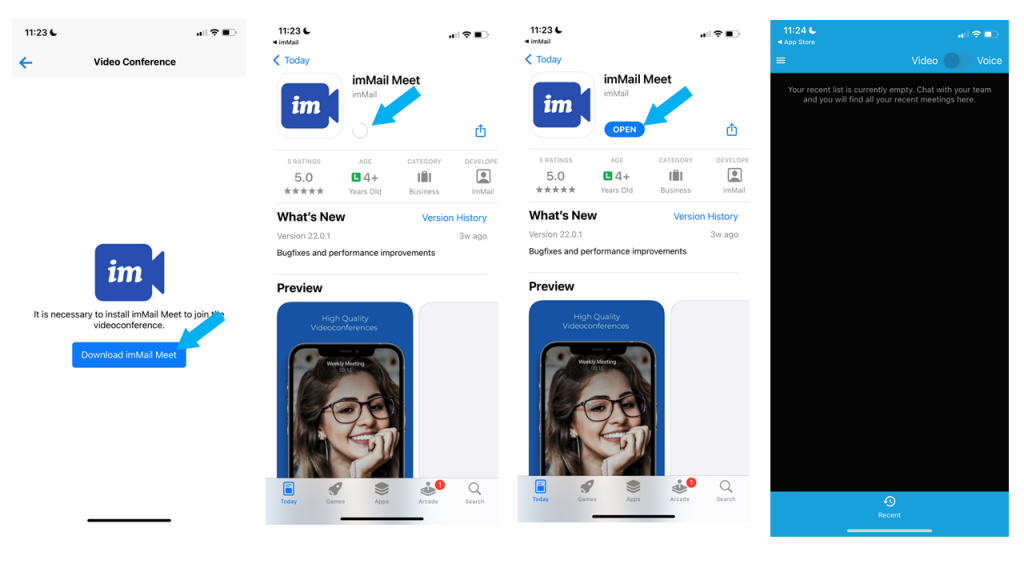
After you see the main imMail Meet app screen you can close it. The imMail Messenger app will start the video conference using imMail Meet app for you.
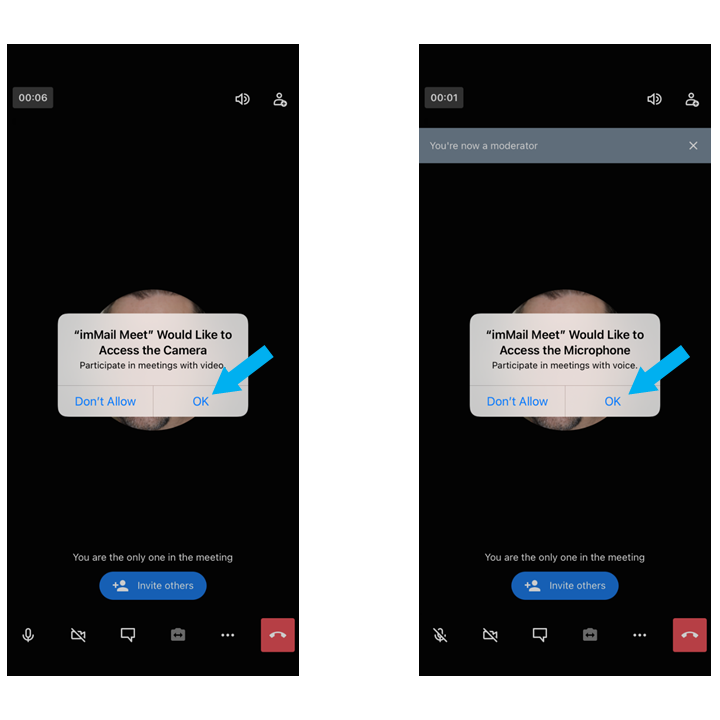
1.4.2 – Allowing Camera and Microphone Access
The first time you run the imMail Meet app you will be asked to allow access to your camera and microphone. Allow access if you intend to be seen by others and/ or to speak during the video conference. Pay attention to this as the system will only ask you the first time and will assume your choices for future video conferences. If you change your mind, you may allow imMail Meet to access your camera and microphone later on the Config button on your mobile.
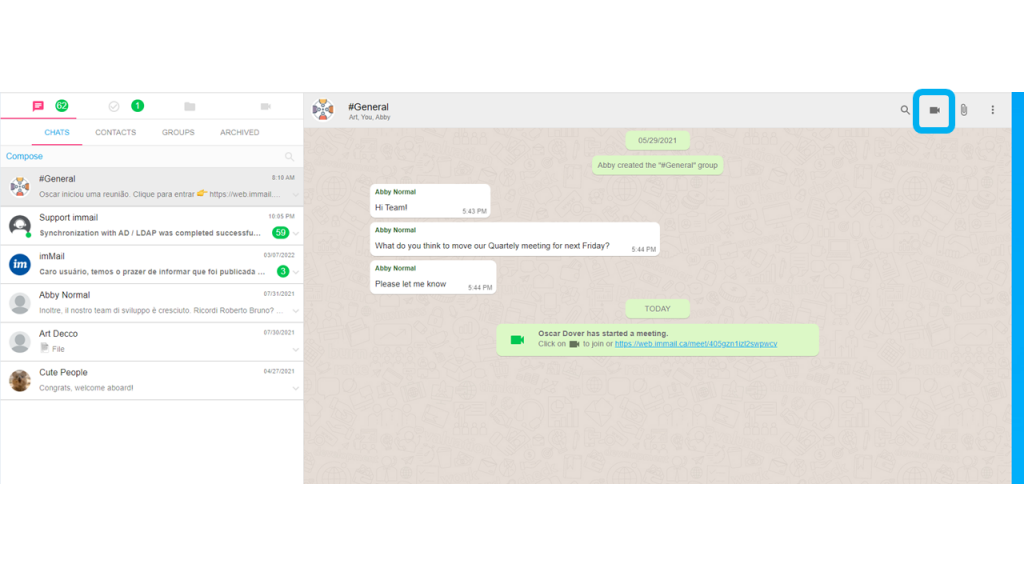
1.4.3 Video Conference Invitation Using Mobile- Private or Group Chat
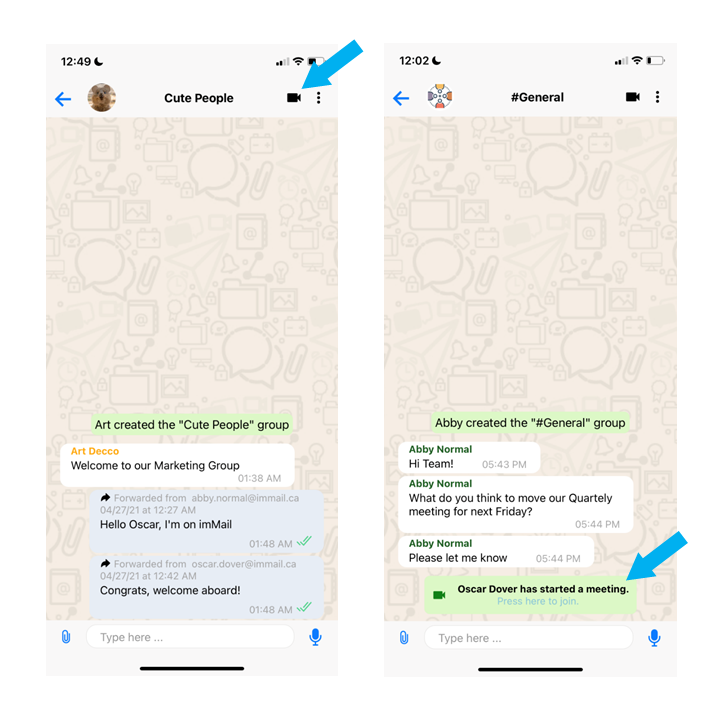
Click on the video camera icon in the upper right corner and:
a) the system will generate a link to others on the chat;
b) you’ll enter your video conference directly or by clicking on the link
1.4.4 Video Conference Invitation Using imMail Meet- Private or Group Chat
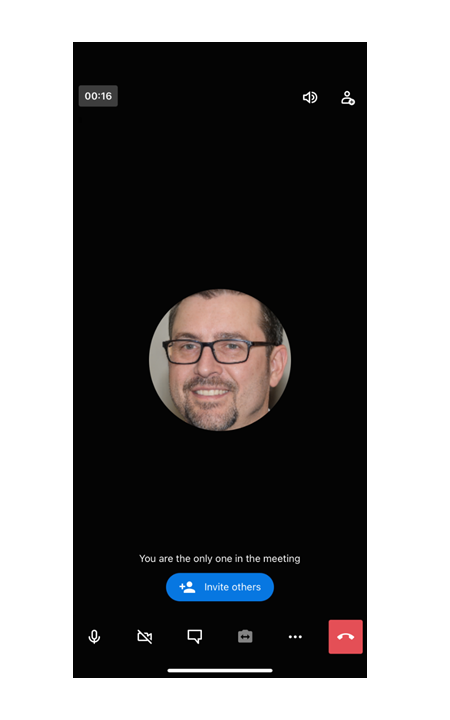
Click on the video camera icon in the middle of the bottom menu and you’ll gain access to your video conference
1.4.5 Video Conference – Main Screen
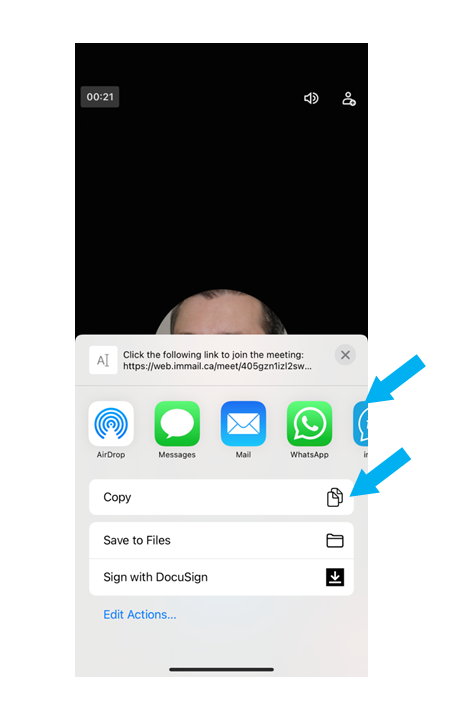
1.4.6 Video Conference Copying Link- Video Conference Screen
To access the link, click on the “Invite Others” button or the icon in the upper right corner of your screen.

You may then share it directly by selecting the appropriate application or copying the link itself.
2. Pre-Meeting Screen-Desktop
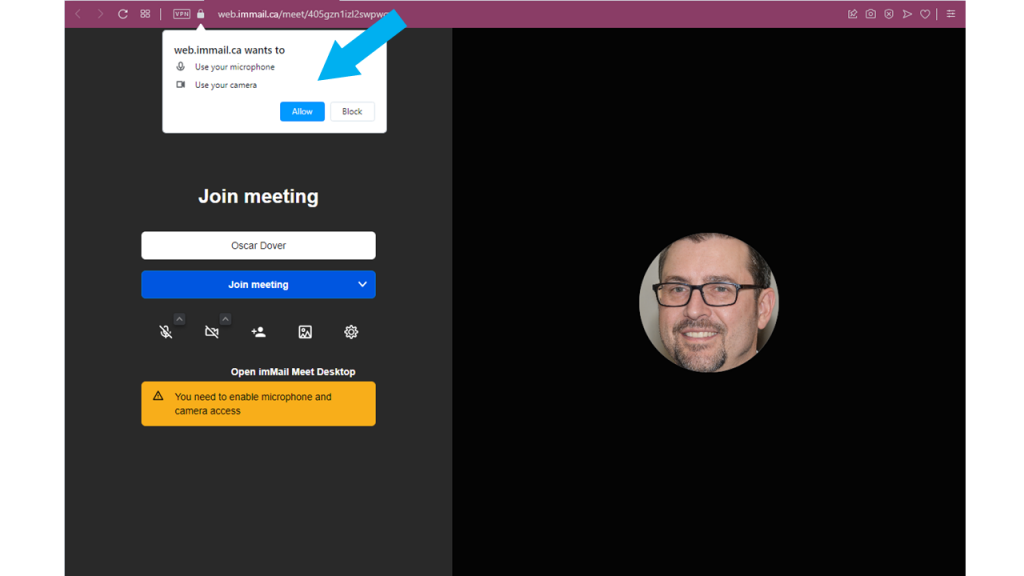
Desktop users will enter a pre-meeting screen before starting the video conference.
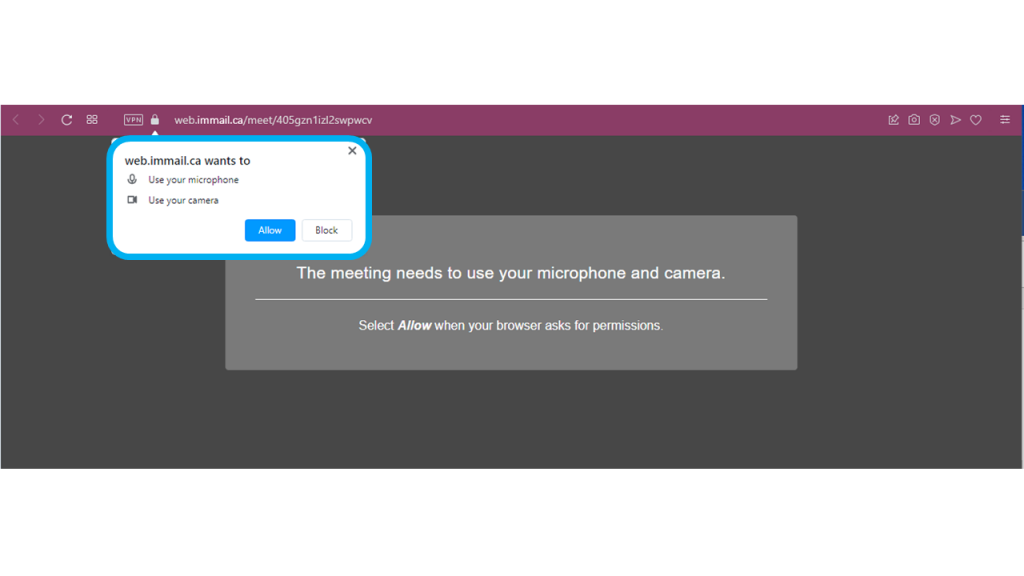
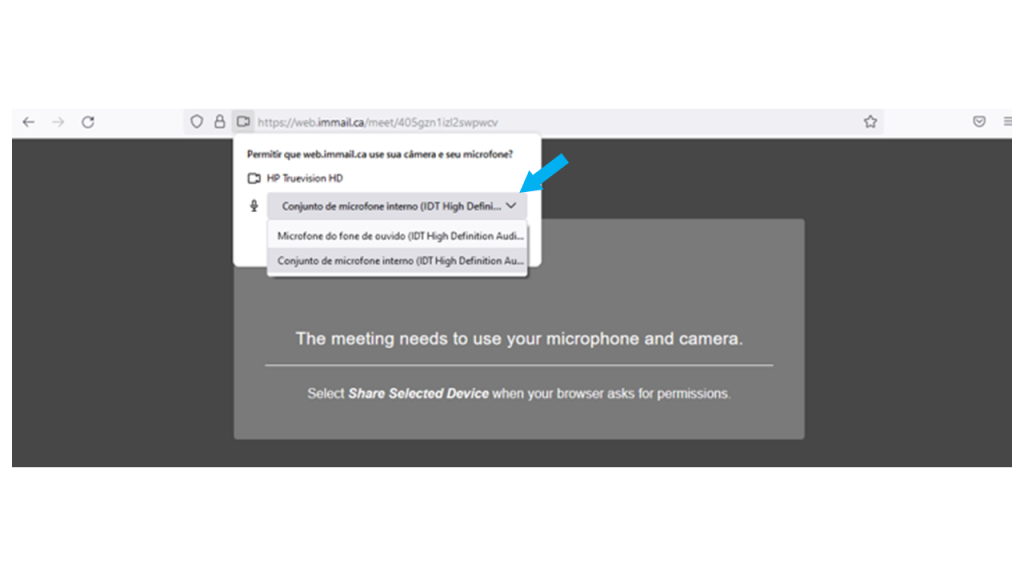
The pre-meeting screen is a good place to ensure that your microphone and camera are on if you wish to collaborate through those tools. Mobile users do not have the microphone and video options before the meeting. The browser will ask your permission to use the microphone and camera once otherwise, the system will assume the original answer for future video conferences.
If you want to change your previous permissions or allow permissions, you’ll have to access your browser configuration page. Please check section 9 on that matter.
or
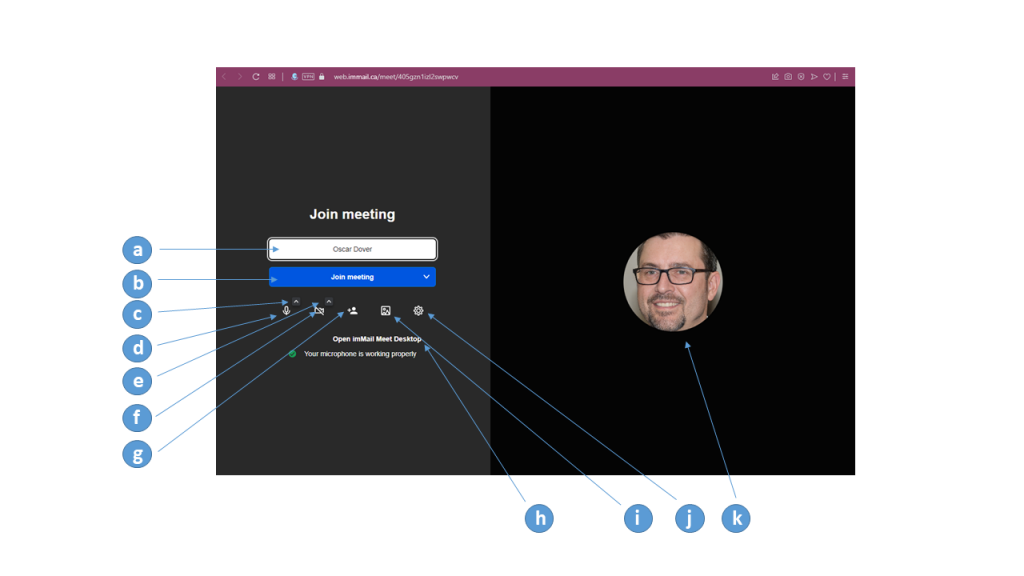
Pre-Meeting Screen Highlights:
a) Type in your name. If you have a logged-in imMail session, the system will fill that field for you. If this field is blank it’s because the system couldn’t find a session, even if you are the creator of the link.
b) Your status of entering the video conference when the meeting begins.
c) Select microphone and speaker system settings (see section 3)
d) Select to enter video conference with microphone open or closed (section 6)
e) Select video camera (if more than one camera is available – see section 4)
f) Select to enter video conference with your video camera on or off (section 7)
g) Invite other people (by copying the link, sending email, and other choices – section 1)
h) Force opening imMail Meet Desktop (if already installed)
i) Select a background
j) Settings (see section 5)
k) Your avatar (configured on imMail Messenger) will be presented if the system can identify your session. If the system cannot identify you, then your initials will be presented
3. Selecting Microphone and Speaker System
Only for Desktops (application and browsers)
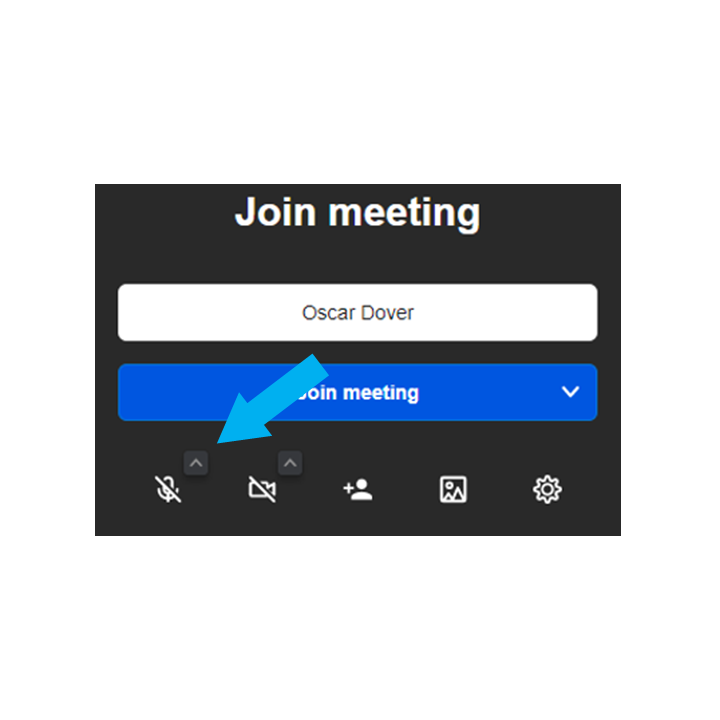
The upper arrow beside the microphone icon allows you to select your preferred options for microphone and speaker settings. When you click on the arrow a menu opens to you.
3.1 Selecting Microphone
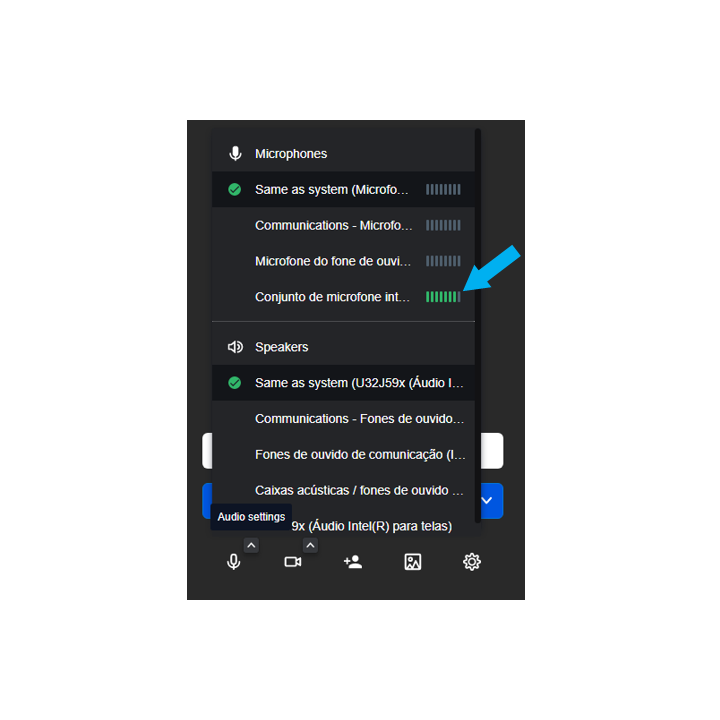
When you speak (for testing purposes) you’ll see some green bars reflecting the level of audio the system is receiving. Select the one with more green bars. With this, you’ll be sure others will listen to you.
3.2 Selecting Speaker System Settings
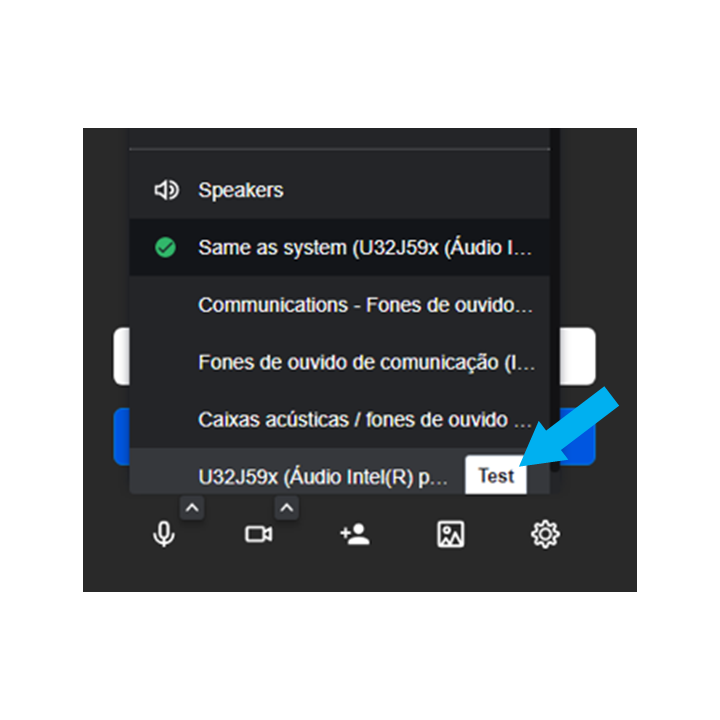
You may have more than one sound system. Mousing over the option you have a “Test” button. Click on it to check if that option is working well. If you have more than one option select the best option for you. With this procedure, you will be sure to hear others.
4. Selecting Video Camera- Desktop
Only for Desktops (application and browsers).
The upper arrow beside the video icon allows you to select the best video camera option if you have multiple. If not you’ll see your sole camera operating.
5. Settings on Pre-Meeting Screen- Desktop
Only for Desktops (application and browsers)
To enter Settings section on pre-meeting screen click on the gear icon.
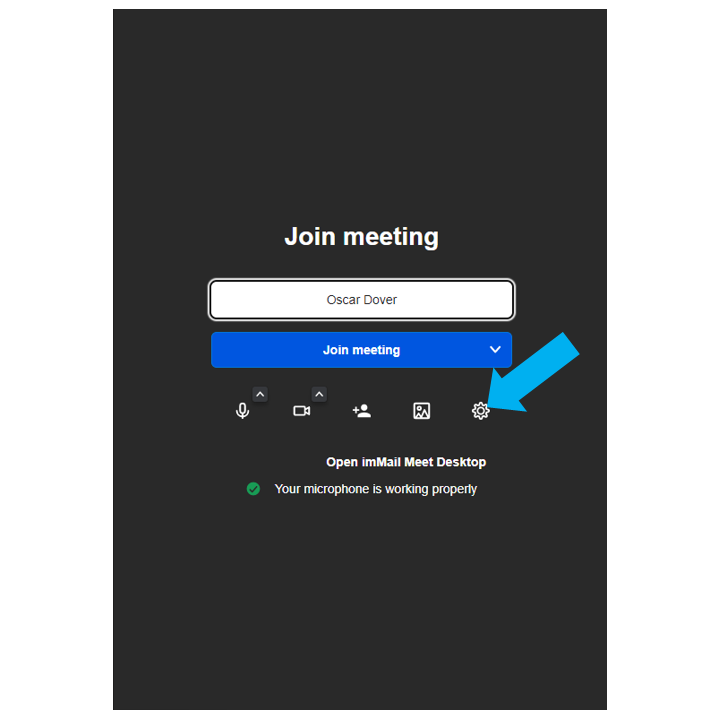
In the settings section, you can select devices, sound, and some other features and configurations.
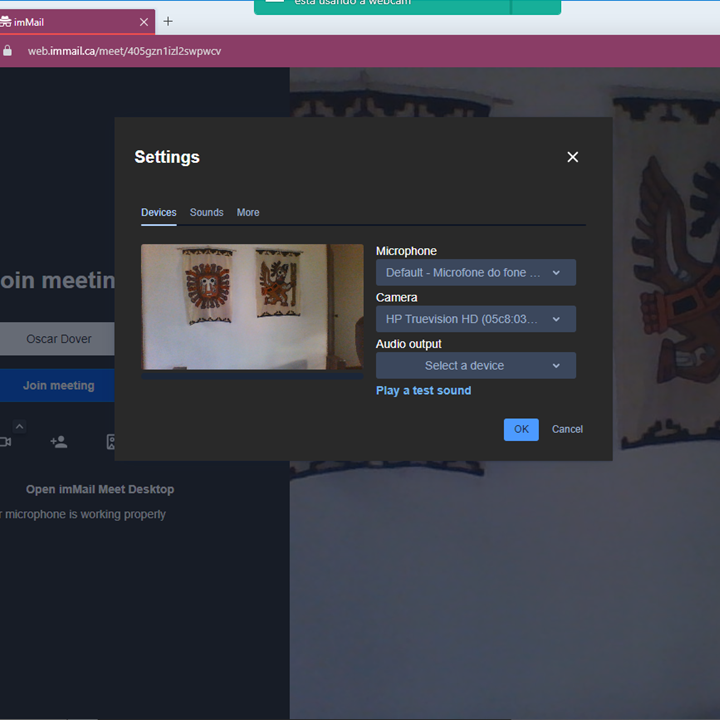
In “devices”, you can select the microphone.
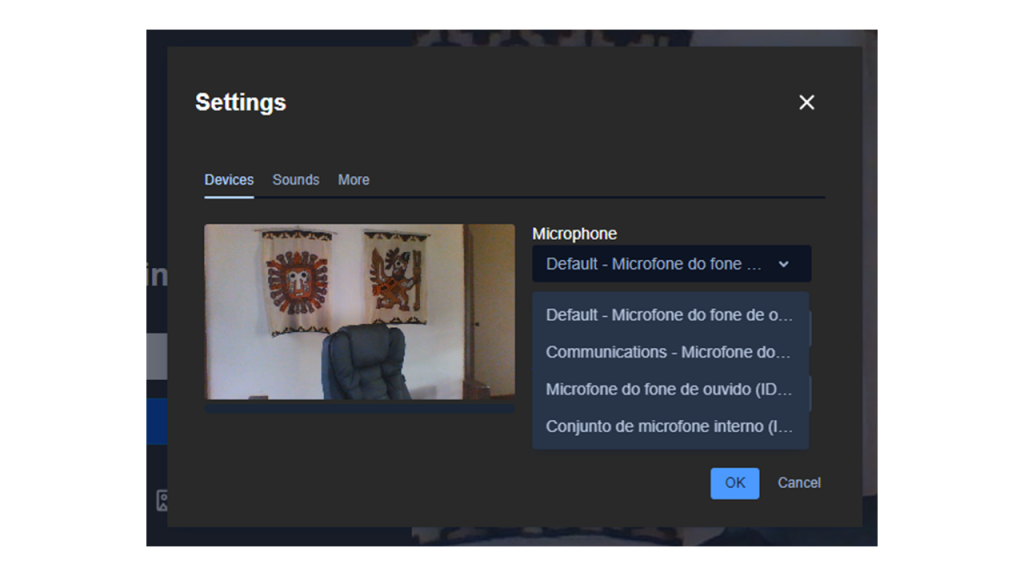
Check your microphone system feedback to ensure your microphone is working properly and to the standard you desire. Please refer to section 3.1 to analyze the feedback on your microphone selection.
In “devices”, you can also select your preferred video camera if you have multiple

In “devices” you can select “Audio Output”, which is the speaker system settings.
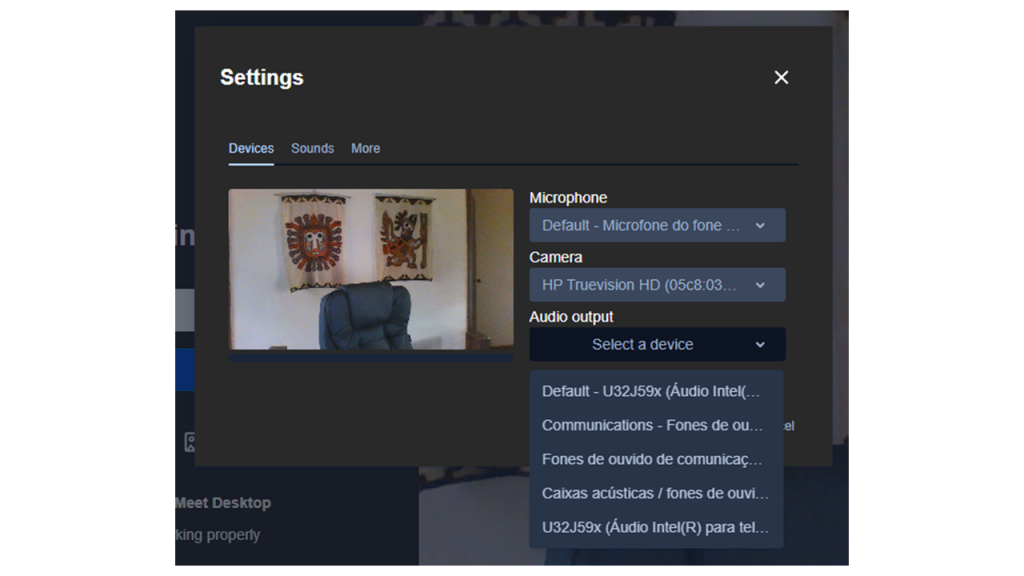
Then click on “Play a test sound” to test if your speaker is functioning properly.

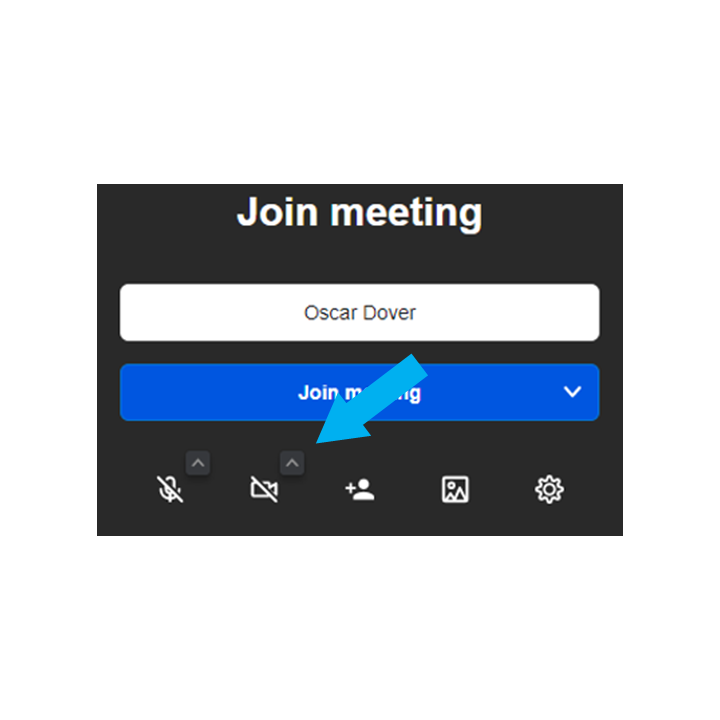
6. Video Conference- Starting with Microphone On or Off
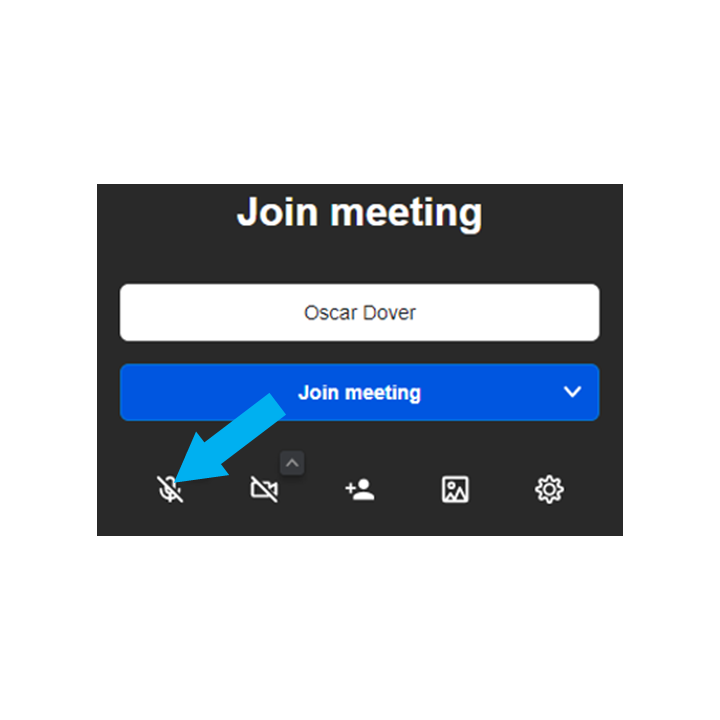
By clicking on the microphone icon you can select starting with your microphone on mute (crossed) or open (not crossed).
The mobile version uses the same technique.
7. Video Conference – Starting with Camera On or Off
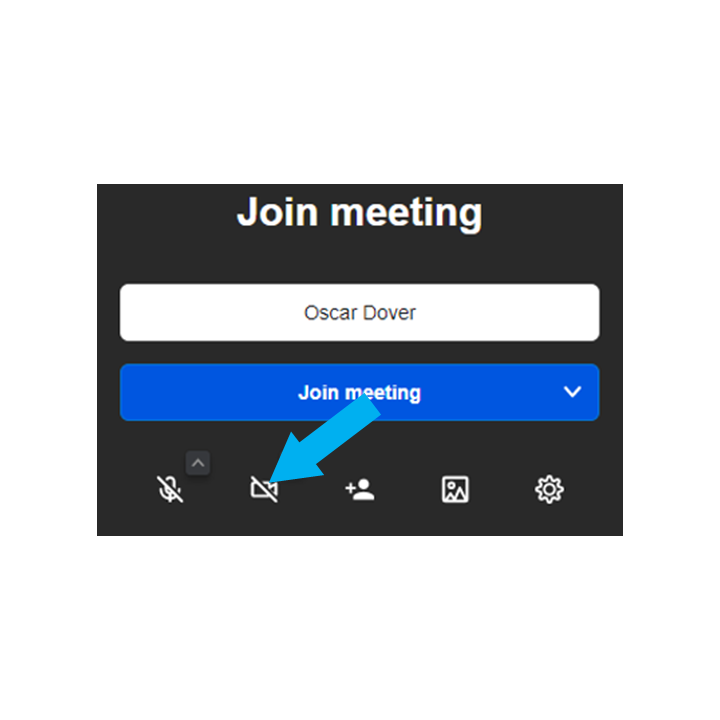
Clicking on the video icon you can select starting with your video camera off (crossed) or on (not crossed).
The mobile version uses the same technique.
8. Video Conference – Configuring Microphone and Camera Inside Meeting
You can select the microphone option or speaker output by clicking on the upper arrow beside the microphone icon. Refer to section 3 for further directions.
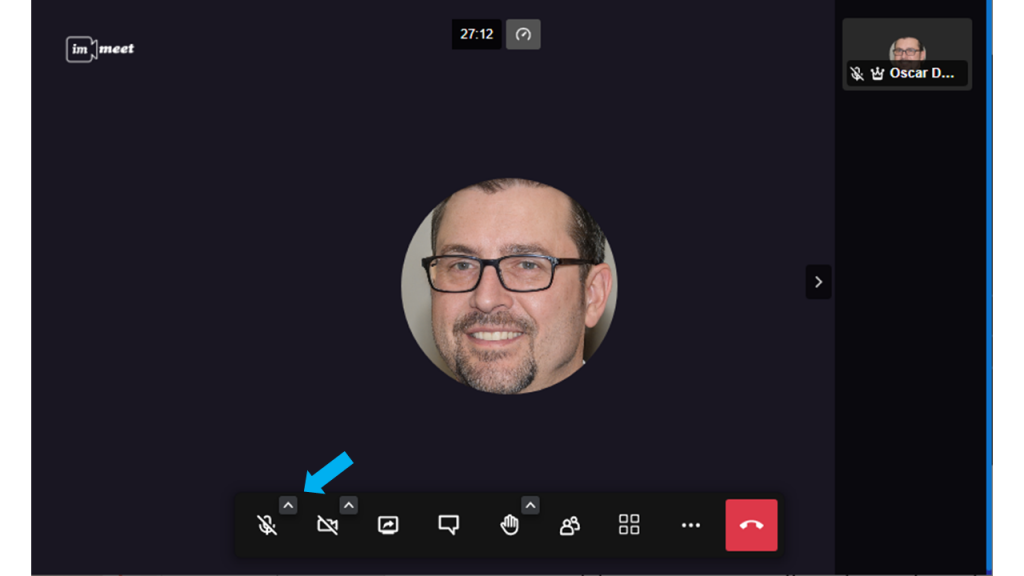
9. Microphone or Camera Not Functioning
You may use the configure section by clicking the up arrow in the top right corner of your desired icon. Please refer to section 8 to reconfigure your microphone or video camera.
If the up arrow is not available it is because it’s been blocked by:
a) not allowing access to the device on the pre-meeting screen.
b) using Firefox.
There is a very simple way to reverse the block. Click on the padlock just before the URL. You can reconfigure what you want using Chrome, Firefox, Edge, or Opera.

You can reconfigure permissions for the microphone and video camera using browsers such as Chrome, Firefox, Edge, and Opera, either in the pre-meeting screen or during the video conference.
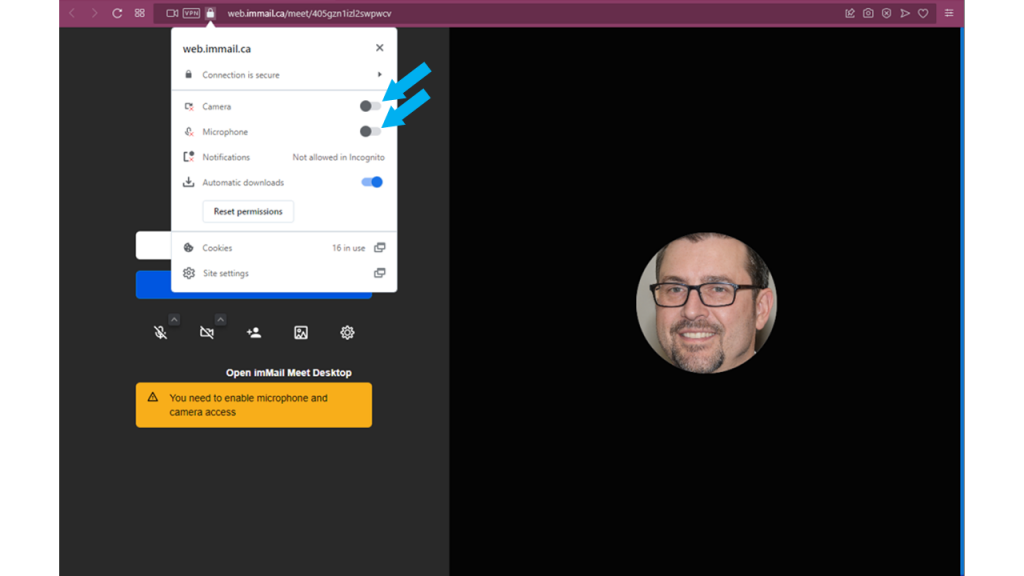
With Firefox, however, the up arrow cannot be unblocked. Your original speaker and microphone system choices can be changed by pressing the padlock to review your permissions.
Alternatively, you may refresh your screen (F5) or consider other alternatives to participate in a video conference (please refer to section 10).
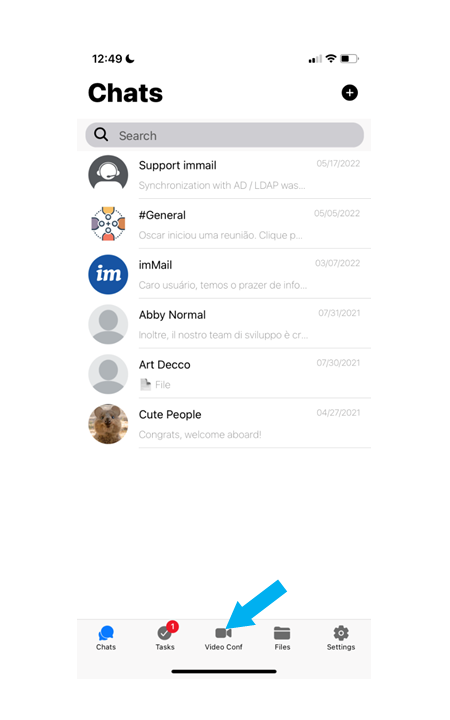
10. How to Access imMail’s Video Conference
a) imMail Meet (desktop version) – alternatively, you may download from the pre-meeting screen
b) imMail Meet app (Android and iOS)
c) Current browsers. We suggest Chrome, Edge, Opera and Safari are best. We do not suggest Firefox as sometimes you cannot select the microphone icon, disallowing you to verbally participate (see section 9).
The best video conference experience is through the desktop application (imMail Meet) and our mobile applications.
You may check our HelpCenter on how to download the application of your choice at https://helpcenter.immail.ca/en/knowledge-base/immail-meet/